Outline
- Introduction
- Access the Server
- Ways to interact with Apache
- Apache Server Configuration files
- Important Information about the Server
- Customise Folder Structure of the Server
- Create Virtual Host
- Host Multiple Websites within One Physical Server
- Create a Website Using C++ (as CGI)
- Conclusion
1. Introduction
Once we install Apache Web Server we need to configure and interact with it. In this article I will discuss about how to access, interact, configure and customise the Apache Web Server.
2. Access the Server
In this example we will use PuTTY to access the Apache Web Server.
Run PuTTy and set the Hostname (or IP address) i.e. the ip address of our server and Port which will be 22. You will be prompted to put the username and password, put the the one created during the installation of Ubuntu Server.
We can check what has been installed using dpkg for Debian/Ubuntu and rpm for RedHat/Fedora.
For Ubuntu to see all installed packages
dpkg -l
Or check for specific package say apache
dpkg -l | grep apache
For RedHat or Fedora
rpm -qa
Or check for specific package say httpd
rpm -qa | grep httpd
3. Ways to Interact with Apache Server
When interacting with Apache there are different action that we can take on. Here are the list of them:
- status: show what Apache is doing
- start: start the parent web server and spawn the children
- stop: Parent tells the children to shut down now and it shuts down (connection terminates)
- graceful-stop: request in progress are completed
- restart: the parent does not fully exit but the children are stopped (required for some low-level configuration changes)
- graceful: also know as reload, nice way of restarting the server (required of minor configuration changes)
These actions can be done in different ways.
A. Using apachectl
One way is to use apachectl script that controls the service.
apachectl status
apachectl start
apachectl graceful-stop
apachectl restart
apachectl graceful
We can check for any error in the config file using apachectl (Always check after editing config file)
apachectl -t
Output:
Syntax OK
If we want to see more information we can use
apachectl -t -D DUMP_VHOST
If we want to see what modules are enabled we can use
apachectl -M
B. Using standardised script provided by Linux
Similarly we can use /etc/init.d/apache2 which is the standardized script provided by most Linux distributions. Let’s start and stop the server using this script:
sudo /etc/init.d/apache2 start
sudo /etc/init.d/apache2 stop
C. Using service
The third way is using service. Let’s reload using service (which is the nicest way of reloading after a minor configuration change)
sudo service apache2 graceful
Both the second and the third methods displays a message about what happen when we run the script, which is helpful.
It is good to check if all the above three methods of controlling the service works with the server.
4. Apache Server Configuration Files
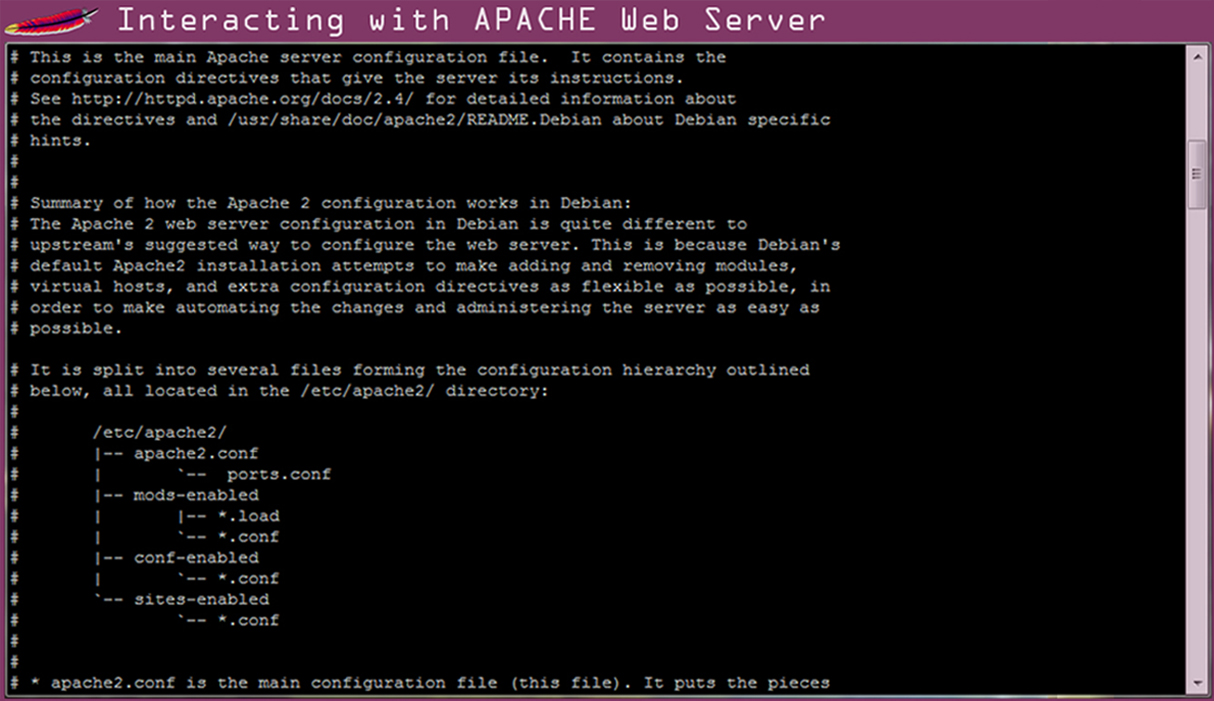
Apache HTTP Server is configured by placing directives in plain text configuration files (/etc/apache2/apache2.conf). In addition, other configuration files may be added using the Include directive, and wildcards can be used to include many configuration files.
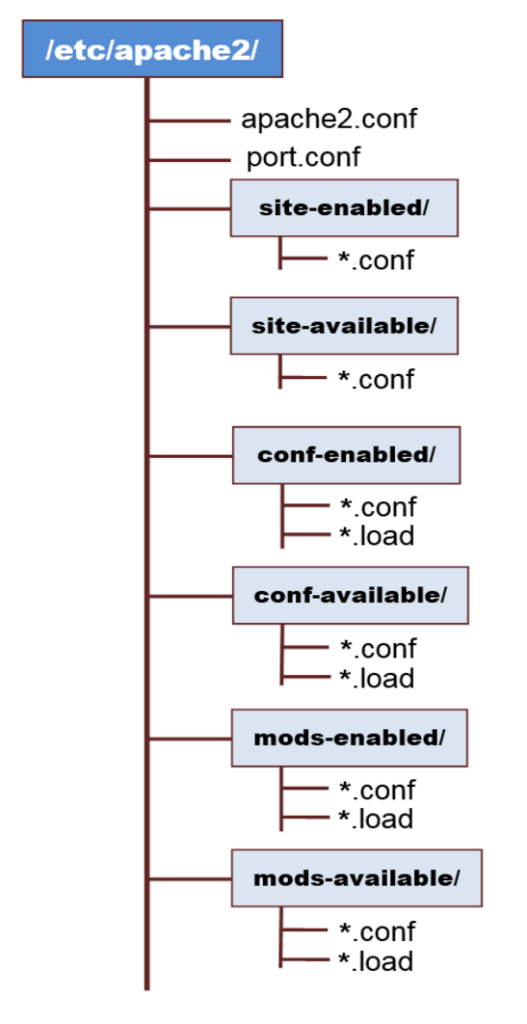
Figure-1. The Apache Configuration Hierarchy
The Apache configuration hierarchy is outlined below, all located in the /etc/apache2/ directory:
apache2.conf is the main configuration file. It puts the pieces together by including all remaining configuration files when starting up the web server.
ports.conf is always included from the main configuration file. It is supposed to determine listening ports for incoming connections which can be customised anytime.
# Include the port.conf in the main config file
IncludeOptional port.conf
Configuration files in the sites-enabled/ directory contain particular configuration snippets which manage virtual host configurations. It is activated by symlinking available configuration files inside sites-available/ directory. This should be managed by using our helper a2ensite/a2dissite which creates the symlinks or removes them (see man pages).
E.g. To remove (deactivate) the symlin 000-default.conf file
sudo a2dissite 000-default
All of this config files inside the sites-enabled/ folder are included in the main config file (apache2.conf) using the IncludeOptional directive as follows:
# Include all .conf files inside sites-enabled/ directory:
IncludeOptional sites-enabled/*.conf
When including, we have to put it as a global not with in any directives such as , , or other sections.
Configuration files in the conf-enabled/ directory contain particular configuration snippets which manage global configuration fragments. It is activated by symlinking available configuration files inside conf-available/ directory. Similarly this should be managed by using our helper a2enconf/a2disconf which creates the symlinks or removes them (see man pages).
Configuration files in the mods-enabled/ directory contain particular configuration snippets which manage modules. It is activated by symlinking available configuration files inside mods-available/ directory. Similarly this should be managed by using our helpers a2enmod/a2dismod which creates the symlinks or removes them (see man pages for more detail).
5. Important Information about the Server
There are important information about the server that we need to know when interacting with the server. This information should be documented properly.
A. Username and password
The username and password was set during the installation of the server.
B. Host name
The host name could be the ip-address. we can get the the ip-address using the command:
ifconfig
C. Operating System of the Server
To get the operating system we can use the following command:
cat /etc/issue
Output:
Ubuntu 14.04 LTS \n \l
or to get more information use:
cat /etc/*-release
D. Version of Apache:
apachectl status
Output includes:
Server Version: Apache/2.4.7 (Ubuntu) PHP/5.5.9-1ubuntu4.14
E. Default Configuration File Location
To get he default location of the configuration file we use:
apachectl -V
Output includes:
-D HTTPD_ROOT="/etc/apache2"
-D SERVER_CONFIG_FILE="apache2.conf"
Therefor the full path of our configuration file will be the combination of both: /etc/apache2/apache2.conf
To check if the file exist:
ls -la /etc/apache2/apache2.conf
Output includes:
8 -rw-r--r-- 1 root root 7115 Jan 8 2014 /etc/apache2/apache2.conf
Therefor the HTTPD_ROOT (Directory where the configuration file is stored) is: /etc/apache2
Note: Fedora and CentOS the full path of the config file (which is one monolithic file) is: /etc/httpd/conf/httpd.conf
The other option to get the location of the configuration file is to search it in the whole file system (try to find httpd.conf – for Fedora)
sudo find / | grep "httpd\.conf"
Or for Debian and Ubuntu try to find apache2.conf
sudo find / | grep "apache2\.conf"
F. Document Root
To find the Document Root (the folder where the site is stored), check for it in all config files:
1. Change directory to the HTTPD_ROOT (default location of the configuration)
cd /etc/apache2
2. Search DocumentRoot (recursively and case insensitive)
grep -Ri DocumentRoot
Output:
sites-available/default-ssl.conf:            DocumentRoot /var/www/html
sites-available/000-default.conf:            DocumentRoot /var/www/html
sites-enabled/000-default.conf:              DocumentRoot /var/www/html
In our case we have only one DocumentRoot which is /var/www/htm/. If we check this directory (/var/www/html) we will see index.html file which is the file served when we request a page using the ip-address. The configuration file for this site is /etc/sites-available/000-default.conf which is the default config file (/etc/sites-enabled/000-default.conf is its symbolic link).
Note: The key directives for a config file are the following:
<VirtualHost *:80>
    # Host name and alternative names
    ServerName test.com
    ServerAlias www.test.com

    # Email address that the server includes in error messages
    ServerAdmin webmaster@test.com

    # Directory that forms the main document tree visible from the web
    DocumentRoot /var/www/test

    # Location where the server will log errors
    # (the filename of the log includes the server name)
    ErrorLog ${APACHE_LOG_DIR}/error_test.log
    CustomLog ${APACHE_LOG_DIR}/access_test.log combined

</VirtualHost>
This virtual Hast listens any request on port 80. It has ServerName www.test.com, it serves from the folder /var/www/test. The error log is stored in the apache log directory – /var/log/apache2. To get different log file for different sites, put the domain name on the file name (e.g. error_test.log).
6. Customise Folder Structure of the Server
Instead of putting the domains in the /var/www/ directory we can create our own file structure in the user’s folder which is /home/. This will help us to work on the sites without the need of root user privilege.
For example if we have a use admin, the DocumentRoot will be /home/admin. Similar to the default folder structure we can have the customised folder structure as follows:
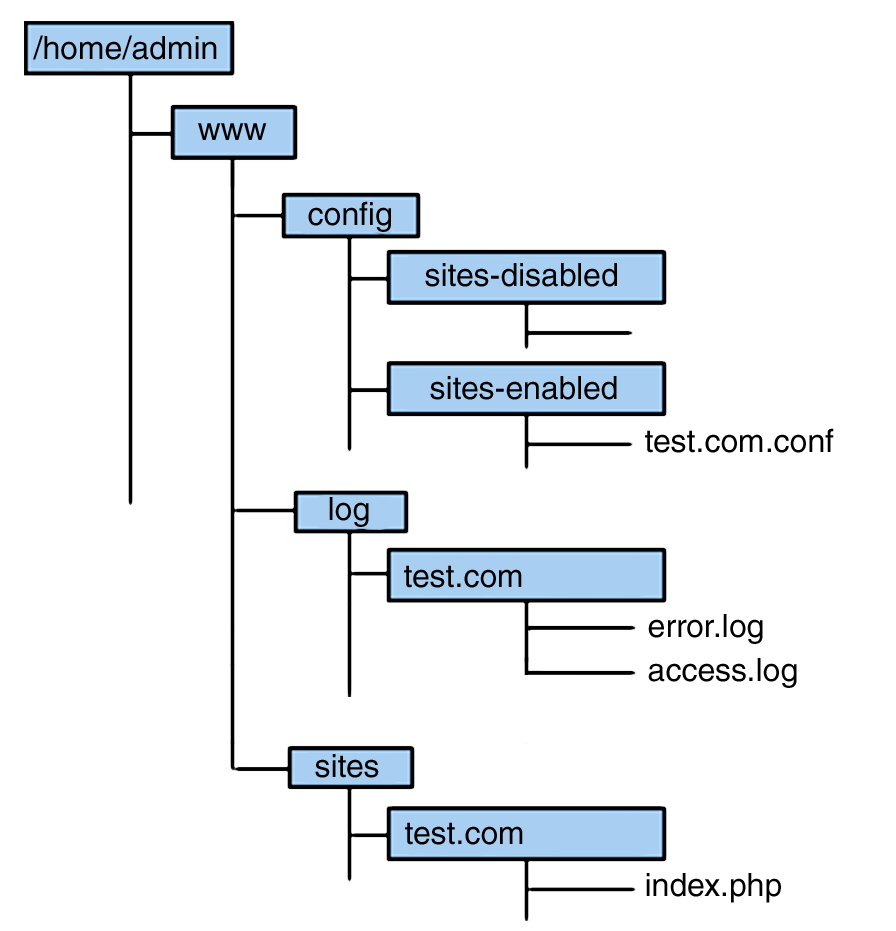
Figure-2. Custom Folder Structure
7. Create Virtual Host
Now let’s create a Virtual Host (test.com) that will be served from our Server using following its customised folder structure. To do that follow the following steps.
i. Write a config file and set the DocumentRoot, ErrorLog and CustomLog to the appropriate directory as shown bellow and put it in the /home/admin/www/config/sites-enabled directory.
Example: the config file for test.com site will look like this:
<VirtualHost *:80>
    # Host name and alternative names
    ServerName test.com
    ServerAlias www.test.com

    # Email address that the server includes in error messages
    ServerAdmin webmaster@test.com

    # Directory that forms the main document tree visible from the web
    DocumentRoot /home/admin/www/sites/test.com

    # Location where the server will log errors
    # (the filename of the log includes the server name)
    ErrorLog /home/admin/www/log/test.com/error.log
    CustomLog /home/admin/www/log/test.com/access.log combined

</VirtualHost>
ii. Include /home/www/config/sites-enabled directory in the main config folder as follows:
# Include the virtual host configuration form other users directory
IncludeOptional  /home/admin/www/config/sites-enabled/*.conf
iii. Create the site content inside /home/admin/www/sites/test.com directory. For this example we will create simple index.php file with the following content:
<?php
   echo "Hello World!";
iv. Check for any error in the config file (when you make change in config files always check!)
apachectl -t
v. Restart the Server
sudo service apache2 reload
vi. Check the website by going to the browser and put the [ip-address]:80. You will see: Hello World!
Virtual Hosting in WAMP Server The main configuration file is C:\wamp\bin\apache\apache2.4.9\conf\httpd.conf # Virtual hosts Include conf/extra/httpd-vhosts.conf The config file that manages the Virtual Hosts is C:\wamp\bin\apache\apache2.4.9\conf\extra\httpd-vhosts.conf <VirtualHost *:80> DocumentRoot "C:\wamp\www" ServerName localhost ErrorLog "logs/localhost-error.log" CustomLog "logs/localhost-access.log" common </VirtualHost> If we want to serve mywebsite.com from a folder C:\wamp\www\Mywebsite, we add a new directive as follows: <VirtualHost *:80> DocumentRoot "C:\wamp\www\Mywebsite" ServerName mywebsite.com ErrorLog "logs/mywebsite-error.log" CustomLog "logs/mywebsite-access.log" common </VirtualHost> Now we can our web site in the browser as mywebsite.com. |
8. Host Multiple Websites within One Physical Server
Virtual Hosting refers to the practice of running more than one web site on a single server machine.
There are two types of Virtual Hosting:
- Name-Based Virtual Hosting – host multiple websites with different name on the same IP address
- IP-Based Virtual Hosting – host multiple websites each web site having its own IP address
Name-Based Virtual Hosting
Now let’s create another host test2.com in addition to the test.com. Follow the six steps in section 7. Set the host name to test2.com and edit the index.php file.
Once we create the site and edit the config file we need to set the domain names. In Windows client (i.e. the machine where we access the sites) this can be done by editing the file hosts found in C:\Windows\System32\drivers\etc. In this file add IP-Address and HostName separated by a space. If our ip-address is 192.168.1.25 then we will add the following lines to the hosts file.
192.168.1.25        test.com
192.168.1.25        test2.com
Then from our Windows machine we can access each sites using www.test.com and www.test2.com.
9. Create a Website Using C++ (as CGI)
Let’s create C++ which prints in the environmental variables into a browser. This is going to be served from our Ubuntu server as one of the virtual hosts, so we have to compile the C++ program in Unix environment. Create a new project (in eclipse) and put this code:
#include <string>
#include <iostream>
#include <stdio.h>
#include <unistd.h> // for environ

using namespace std;

int main() {
    /* List all of the environmental variables */
    string str = "";

    // environ points to an array of pointers to strings called the "environment" with the last pointer NULL

    char **p = environ;
    while (*p != NULL)
    {
       string s = *p;
       str += s + "\n";
       *p++;
    }
    printf(
           "Status: %i %s\n"
           "Content-type: %s\n"
           "Content-length: %i\n"
           "\n",
           200,
           "OK",
           "text/plain",
           str.length()
          );
    fwrite(str.c_str(),1,str.length(),stdout);

    return 0;
}
Compile the program and name the compiled file index.cgi and put it in the DocumentRoot inside the /home/admin/www/sites/cpp.com directory.
Note: if we want to run CGI script in our server we have to enable the cgi mode using the command:
sudo a2enmod cgi
Then restart the server
sudo service apache2 reload
When running any script remember to have the correct permission.
Now lets create a config file (cpp.conf) and put it in the /home/admin/www/config/sites-enabled directory. The content of the config file will be as follows:
<VirtualHost *:80>
    # Host name and alternative names
    ServerName cpp.com
    ServerAlias www.cpp.com

    # Email address that the server includes in error messages
    ServerAdmin webmaster@cpp.com

    # Directory that forms the main document tree visible from the web
    DocumentRoot /home/admin/www/sites/cpp.com

    # set the proper Directory to run cgi script
    <Directory "/home/admin/www/sites/cpp.com">
       Order allow,deny
       AllowOverride None
       AddHandler cgi-script .cgi
       Options +ExecCGI
       Require all granted
       Allow from all
    </Directory>

    # Location where the server will log errors
    # (the filename of the log includes the server name)
    ErrorLog /home/admin/www/log/cpp.com/error.log
    CustomLog /home/admin/www/log/cpp.com/access.log combined

</VirtualHost>
Check for any error in the config file (when you make change in config files always check!)
apachectl -t
Restart the Server
sudo service apache2 reload
We need to edit the the hosts file by adding the following line.
192.168.1.25 www.cgi.com
Then check the site www.cpp.com we will see all the list of Environmental variables.
10. Conclusion
In this article I have discussed the different ways of interacting with Apache Sever, configuring and creating multiple virtual hosts within one Server. Since it is good to document some of the important information of the Server I have tried to cover some of the commands that helps to get these information. Hope it is helpful.
Cheers!